Pumpkin Chocolate Chip Cookies Two Ways
November 11, 2010 at 5:56 pm | Posted in Uncategorized | 10 Comments
Every since the great Canned Pumpkin Shortage of 2010 began to wind down, I’ve been keen to find as many ways as possible to use the canned pumpkin I had hoarded from last fall. I’d especially been craving some pumpkin chocolate chip cookies, and I had found a number of recipes that looked good and worthy of a try. With the holiday today, I had some extra time to bake, so here are two different recipes for pumpkin chocolate chip cookies.
The first recipe is super easy and only calls for three ingredients:

Mix together one spice cake mix, one 15-oz can of pumpkin (the smaller size), and two cups of chocolate chips.

Scoop by spoonfuls onto a greased cookie sheet, and bake in a 350-degree oven for 12-15 minutes.

Smack the cookie sheet onto the counter a few times to keep your cookies from becoming too puffy.

Not the prettiest cookies ever, eh? A little on the rustic side for my liking.
So on to recipe #2:


Pumpkin Pie Bites
October 20, 2010 at 9:02 pm | Posted in Uncategorized | Leave a comment
Honestly, my mom should get credit for these. I’ll never forget the year I asked for a chocolate cake with chocolate frosting for my birthday, and she had a little issue with the stacking of the two round layers, so she crumbled the cake into a bowl and poured the frosting on top. She called that “cake mash,” and it was delicious. Now her idea takes a decidedly autumnal turn in these pumpkin pie bites – I hope you enjoy!
Pumpkin Pie Bites
1 box French Vanilla cake mix
1 cup canned pumpkin
1/2 tsp cinnamon
1/8 tsp allspice
1/8 tsp freshly grated nutmeg
3/4 cup water
1/3 cup vegetable oil
4 eggs
1 can cream cheese frosting
1.5 pounds semi-sweet chocolate (or white bark or whatever you prefer)
Preheat your oven to 350.
Beat the cake mix with the pumpkin, spices, water, oil, and eggs, and bake in a 9 x 13 pan.

Crumble the cake in a bowl and add the can of cream cheese frosting.

Beat with an electric mixer until the cake mix holds together.

Roll into balls about the size of a golf ball.

Melt your chocolate. Dip in your balls with a spoon and place on a waxed paper lined pan .

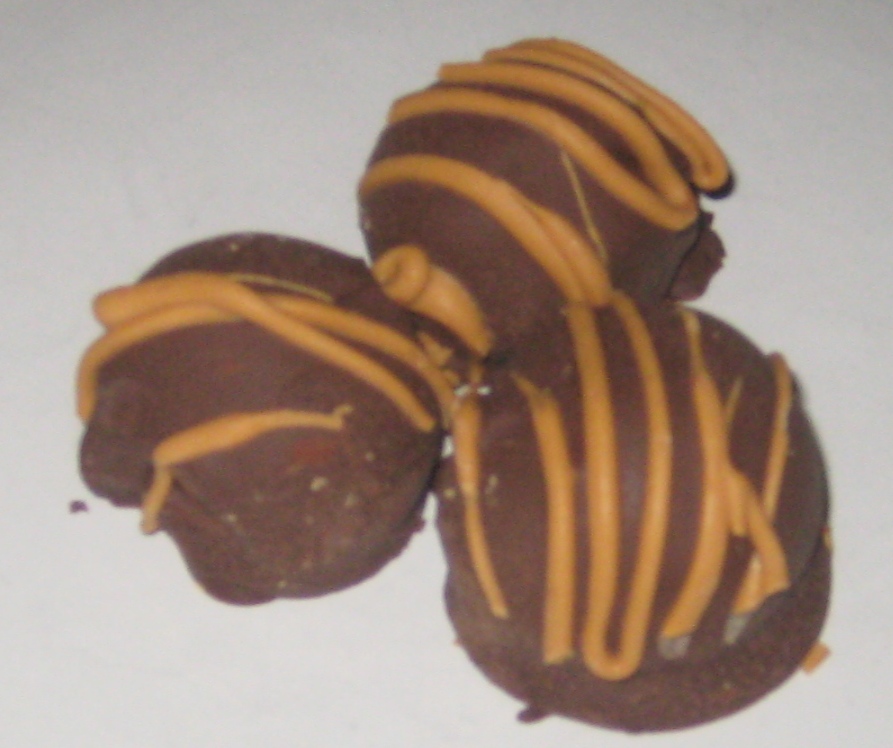
Decorate how you like! Would be cute with little nuts, but I went with an orange colored drizzle to help identify the pumpkin. The ones I dipped in white chocolate actually turned out much cuter!

Store these at room temperature and enjoy – thanks Mom 🙂
Pumpkin Apple Crisp
October 17, 2010 at 10:29 am | Posted in Uncategorized | 3 Comments
I wanted to find a recipe to put some of that pumpkin butter I just made to use, and the first thing I came across was a recipe for an apple cobbler-like dessert. I modified it a little, and I think it turned out great! Definitely a keeper for fall.
- 6 apples, peeled, cored, and sliced thin (I used three gala and three granny smith)
- 1/2 cup sugar
- 1 tablespoon cinnamon
- 1 cup pumpkin butter
- 1 box pumpkin bread mix
- 1/4 cup melted butter
Preheat your oven to 350. Toss the apple slices with the cinnamon and sugar.

Add the cup of pumpkin butter and mix well.

Spread your apples in a pan and sprinkle the box of bread mix on top. That’s right, just pour the bread mix on top.

Yes, dump it on.

Drizzle the melted butter over the dry mix, trying to cover thoroughly… but just do your best.

Pop in the oven for 45 minutes.

Serve warm with vanilla ice cream!!

Pumpkin Butter… pumpkin pie in a cup!
October 10, 2010 at 1:07 pm | Posted in Uncategorized | Leave a comment
I love the fall for a lot of reasons, one of which is all the pumpkin flavored goodies you can make and buy right now. Although I have a few pumpkin recipes that will get made several times during the season (pumpkin cheesecake, pumpkin gooey cakes), I knew I wanted to make pumpkin butter at least once this fall. This weekend afforded me the perfect opportunity, mostly because I had all the ingredients on hand INCLUDING apple juice because it was brought over to a party hosted at my house on Tuesday. Normally I would never buy apple juice, nor would I be able to drink a whole container, but there was just enough left after the party to make a full batch of pumpkin butter – and if that’s not a sign it was time to make it, I don’t know what is!
This recipe is super easy and would make a great holiday gift.
- 1 29 ounce can pumpkin puree
- 3/4 cup apple juice
- 2 teaspoons ground ginger
- 1/2 teaspoon ground cloves
- 1 1/2 cups white sugar (could substitute with brown sugar but I’d use a little less to avoid getting it too sweet)
- 2 teaspoons ground cinnamon
- 1 teaspoon ground nutmeg
Combine all the ingredients into a saucepan.

Stir well.

Bring to a boil, then reduce heat and simmer for at least 30 minutes. The color will turn a little darker and the consistency will become more smooth. Pour into containers and let chill.

To serve (assuming you don’t just want to eat it with a spoon), just spread it on muffins, bread, graham crackers – anything you like really. This will keep for about a week in the fridge or for months in the freezer.

Happy Fall!
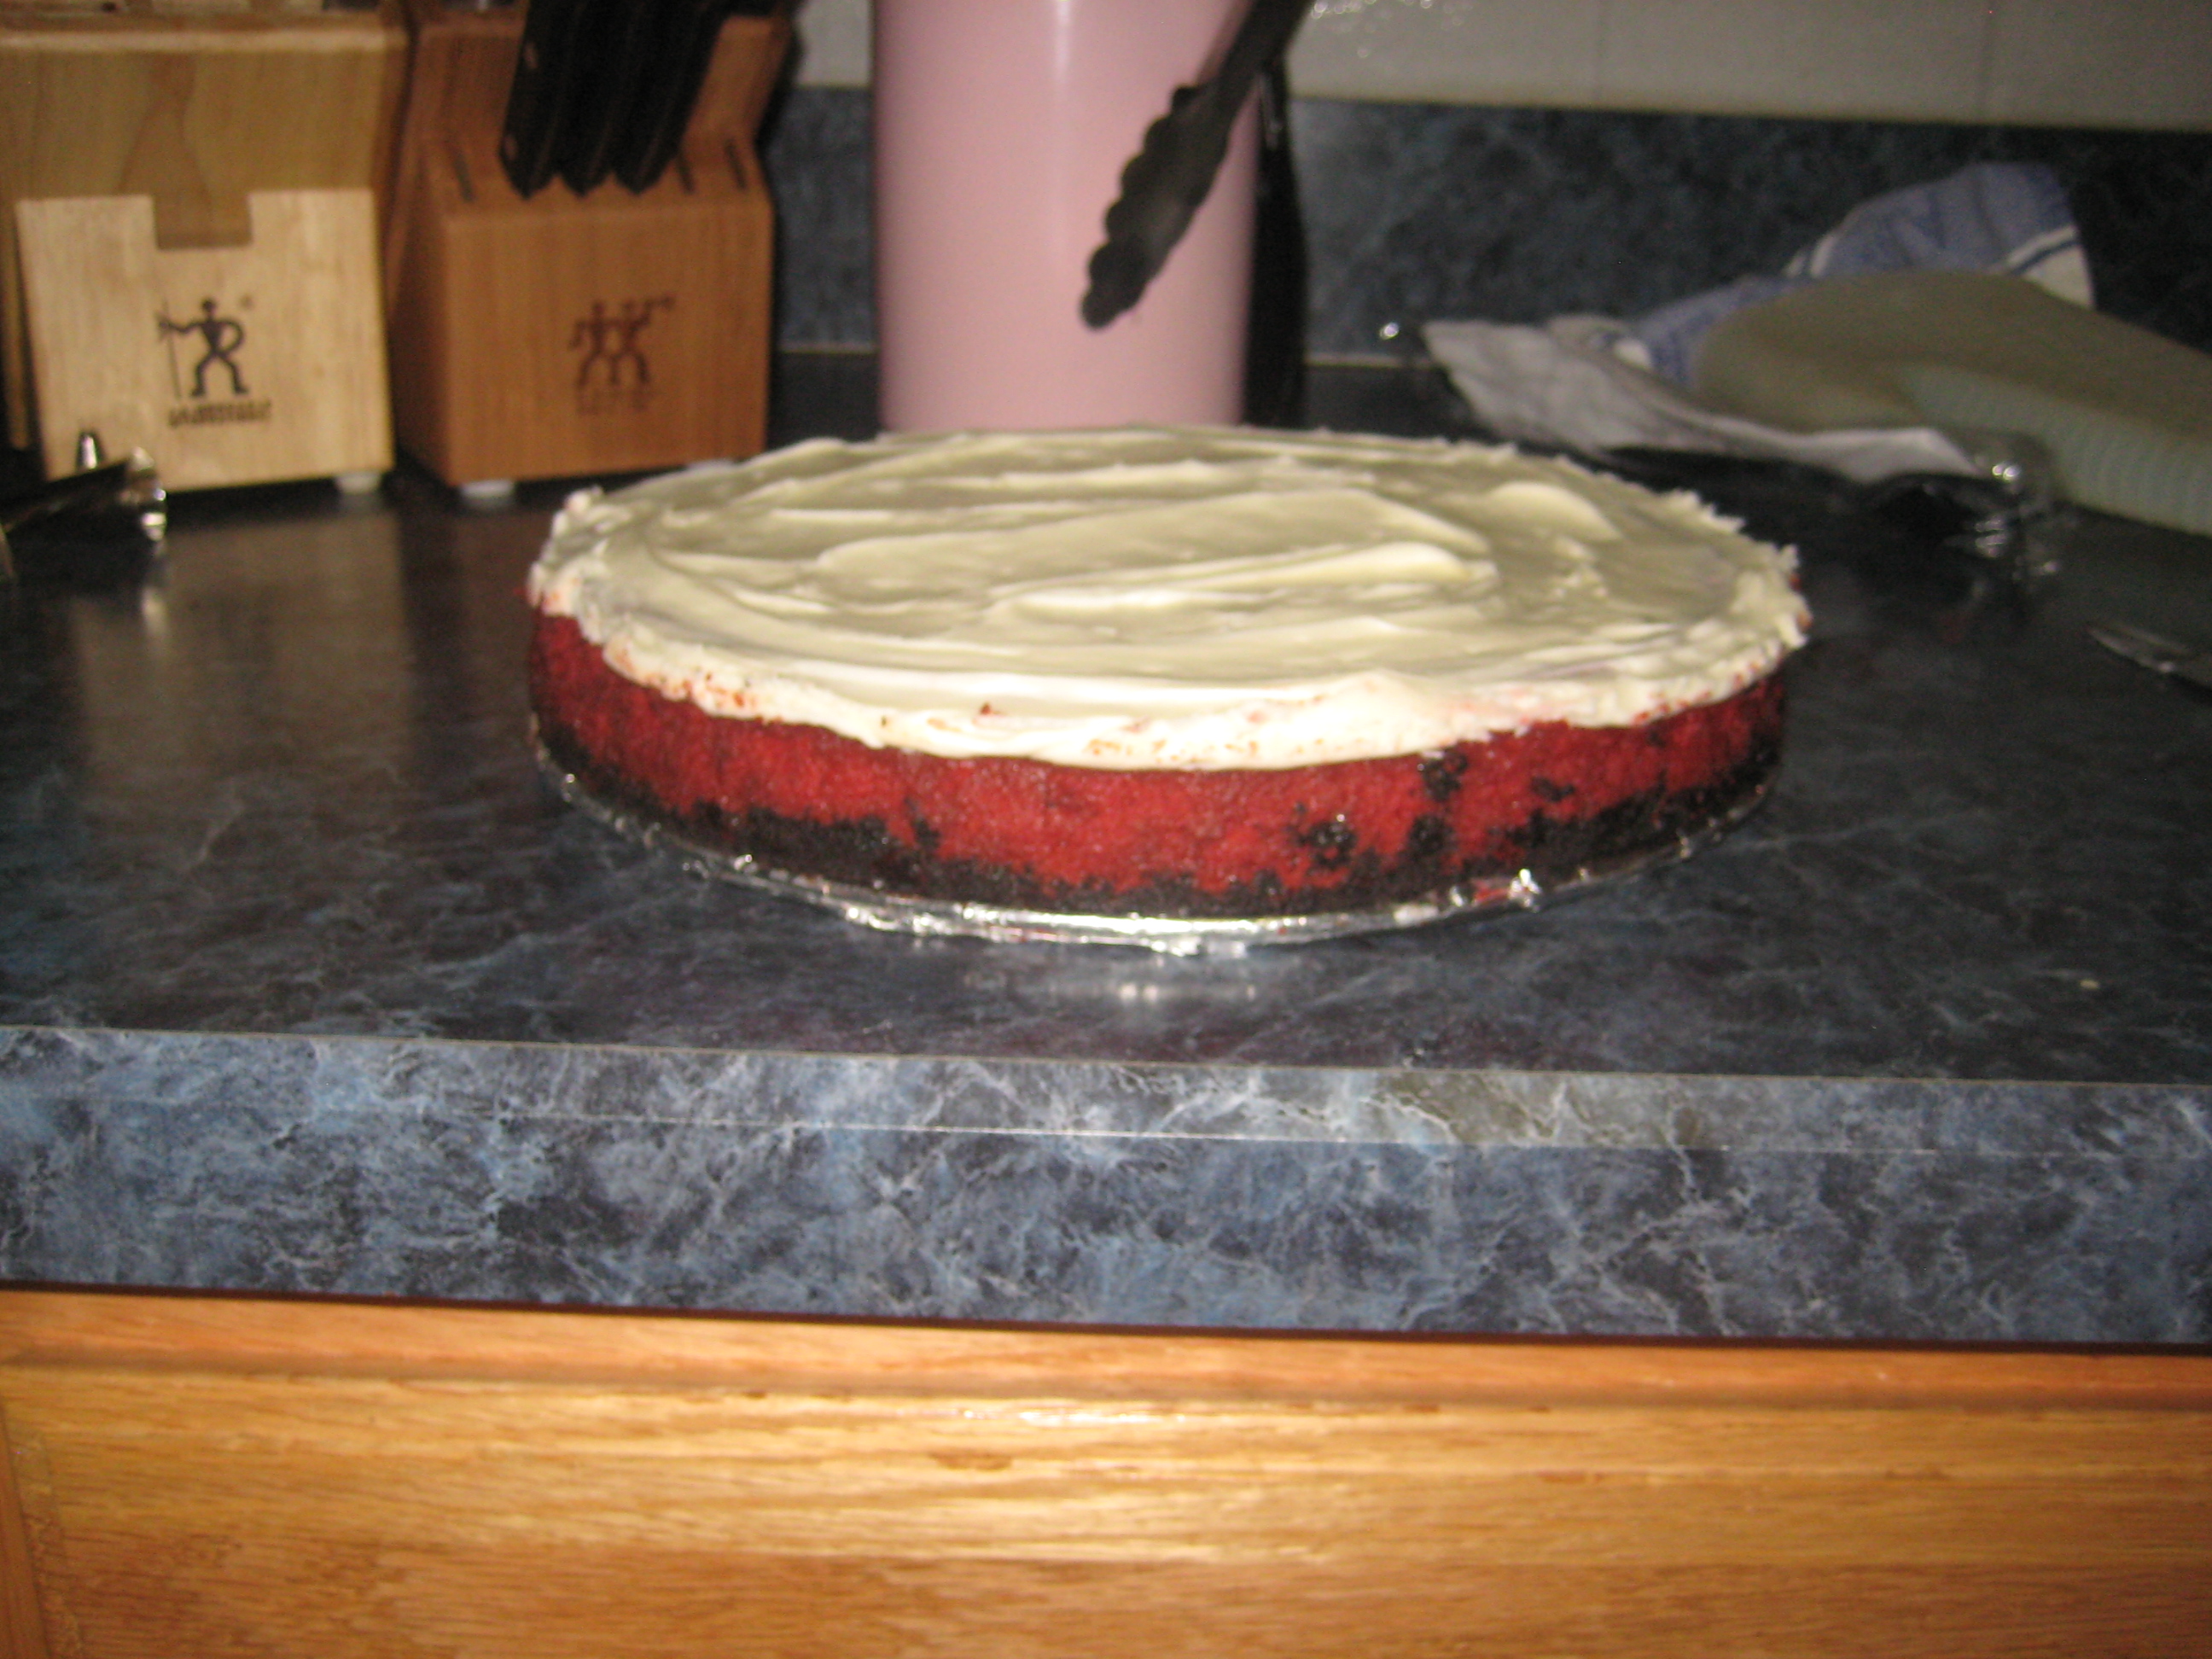
Red Velvet Cheesecake
September 26, 2010 at 7:33 pm | Posted in Uncategorized | 1 Comment
If I end up making a recipe twice within a month, it must be pretty good. (If it gets made a few times in two weeks, it must be awesome, for the record.) This red velvet cheesecake is definitely pretty good, since I’ve made it twice in September! This is adapted from a Southern Living recipe, and it’s attractive and unusual and would be lovely to serve to company.
When made in a 9 inch springform pan, each slice turns out quite pretty.
 When made in a mini cheesecake pan, they make a great “finger food” dessert.

If you’re looking for a good mini cheesecake pan, I have the Norpro one, and I like it pretty well.

Crust:
1 package of oreos, ground fine in the food processor
1/4 cup butter, melted
Cheesecake:
3 8 oz. packages cream cheese, softened
1 1/2 cups granulated sugar
4 large eggs, lightly beaten
3 tablespoons unsweetened cocoa
1 cup sour cream
1/2 cup whole buttermilk
2 teaspoons vanilla extract
1 oz. bottle of red food coloring
For the topping:
1 (3-ounce) package cream cheese, softened
1/4 cup butter, softened
2 cups powdered sugar
1 teaspoon vanilla extract
Garnish: fresh mint sprigs
Stir together oreo crumbs and melted butter; press mixture into bottom of a 9-inch springform pan OR press about 1 tablespoon of mixture into bottom of each mini cheesecake hole
Beat the 3 packages of cream cheese and 1 1/2 cups granulated sugar at medium-low speed with an electric mixer 1 minute. Add eggs and next 6 ingredients, mixing on low speed just until fully combined. Pour batter into the crust (or mini crusts).
Bake at 325° for for 1 hour and 25 minutes or until center is firm. Run knife along outer edge of cheesecake. Cover and chill.

Beat 1 package cream cheese and 1/4 cup butter at medium speed with an electric mixer until smooth; gradually add powdered sugar and vanilla, beating until smooth. Spread evenly over top of cheesecake (or pipe a dollop onto each mini cheesecake). Store covered in the fridge!!

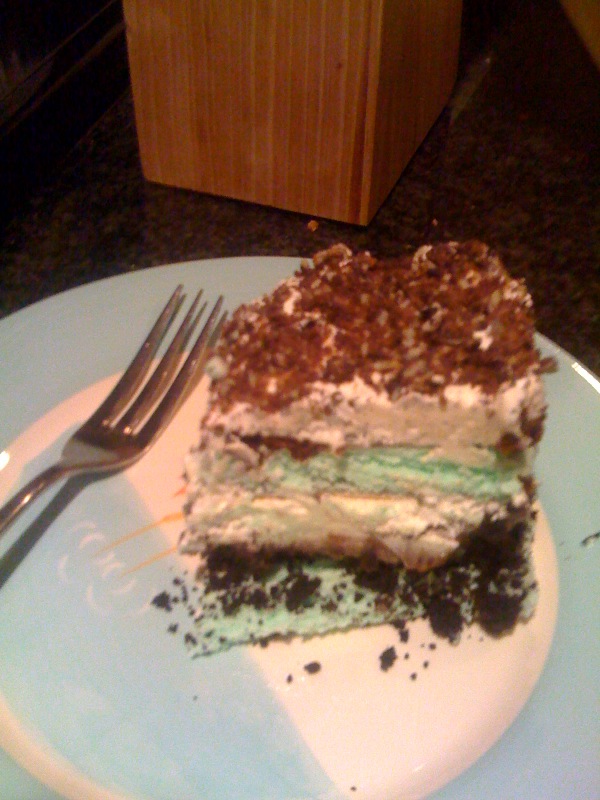
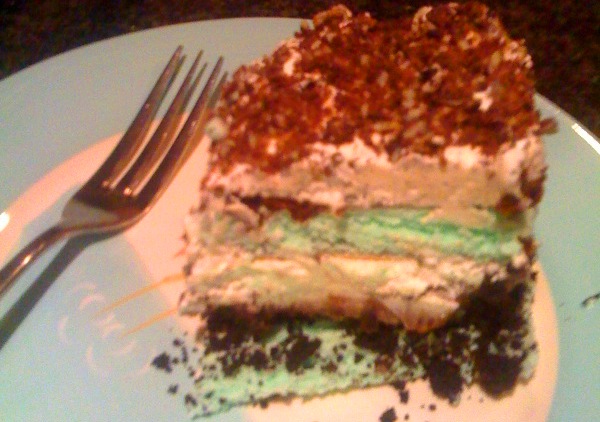
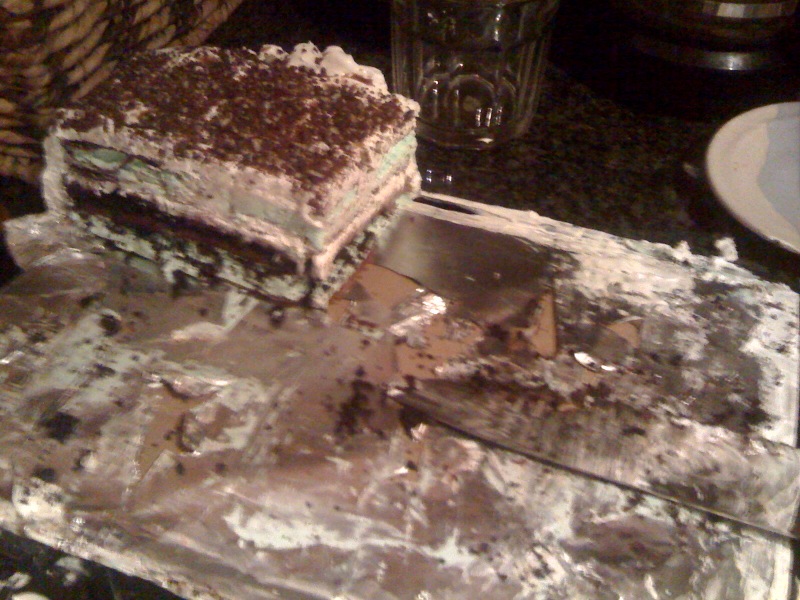
Mint Chocolate Chip Ice Cream Lasagna
September 12, 2010 at 7:20 pm | Posted in Uncategorized | 1 Comment
I really wish I could remember where I first heard about this recipe. I owe a debt of gratitude to the forgotten person who shared it with me!
It was described to me as an “ice cream sandwich cake,” but the first time Matt had it, he dubbed it “Ice Cream Lasagna.”
It is truly the world’s easiest way to make an ice cream cake, and the layers are so pretty when it is cut. This particular version was for the birthday of a friend who likes mint chocolate – so it is modified slightly from the original. Basically, whatever flavors and toppings you like will work, so be creative and enjoy!
25 ice cream sandwiches (these were mint chocolate chip ice cream sandwiches)
1 jar of hot fudge
1 large tub of cool whip, softened
chopped candy for the topping (I used Andes mints)
1 package of Oreos, crushed in food processor to powdery consistency
Line the bottom of a 9×13 pan with aluminum foil. Unwrap the ice cream sandwiches and arrange them tightly in the bottom of the pan – cutting them if necessary to fit.

Next, top the layer of ice cream sandwiches with about half of the cool whip.


Then top the layer of cool whip with the slightly warmed hot fudge.

And gently spread the hot fudge all over the layer.

Cover this layer with the chopped up Oreos. I mixed a little chocolate sauce in with the Oreos because I was afraid it might be too crumbly out of the freezer, but it probably wasn’t necessary. And now you’re ready for the next layer of ice cream sandwiches!

Cover the Oreo layer tightly with ice cream sandwiches, cutting them to fit as before.
(At this point, you could frost the top with cool whip, top with candies, and put it back into the freezer to freeze before serving, but since this was for a special occasion, I proceeded a little differently.)
Now, I played a foil covered piece of cardboard on top of the pan and flipped the cake upside down.

Now I covered the whole cake in a layer of cool whip.

And topped it with the chopped Andes mints and a drizzle of chocolate.

Now back into the freezer to harden up before serving! And cut to serve.

Look at the pretty layers!!
")
The end.

Matt’s Favorite Chicken
August 24, 2010 at 8:51 pm | Posted in Uncategorized | Leave a commentMatt’s Favorite Chicken!

This chicken doesn’t have a name or a real recipe because I can’t remember where it came from. But it is good, and you should make it, and then it might become (Insert Your Name Here)’s Favorite Chicken.
- boneless chicken breasts (2-6)
- 1 cup sour cream
- 2 tablespoons (or so) lemon juice
- 1 tablespoon soy sauce
- a generous amount of garlic salt (2-3 teaspoons – I used low sodium soy sauce so I was very generous!)
- Pepperidge Farms herb seasoned stuffing mix, crushed into fine crumbs
Preheat oven to 350. Combine sour cream, lemon juice, soy sauce, and garlic salt.

Set up an assembly line of chicken, sour cream sauce, breadcrumbs, and your foil lined pan.

Dredge the chicken in the sour cream mixture and then cover in bread crumbs. Place on baking sheet.

Bake in preheated oven for 45 minutes.

Ready to serve!
Makes super moist, super tangy chicken!
Cookie Dough Truffles
August 13, 2010 at 8:51 pm | Posted in Uncategorized | 3 Comments
I came across this recipe awhile back, and it is a crowd favorite, so these went with Matt to a potluck at work today. I have to admit – I think making them is a little like childbirth in that you need to forget how long/arduous/terrible the process is in order to be willing to make them again. But please, don’t let that deter you from giving these a try. Obviously the whole childbirth memory loss has been working for awhile – I’ve made these no less than five times.
So with no further ado, cookie dough truffles!
- 1/2 cup softened butter
- 3/4 cup firmly packed brown sugar (I prefer light brown sugar)
- 1 teaspoon vanilla extract
- 2 cups all-purpose flour
- 1 can sweetened condensed milk
- 1 cup semisweet mini chocolate chips
- 1 1/2 pounds semisweet chocolate baking squares, ready to melt
Cream the butter and brown sugar with an electric mixer, then add the vanilla. Gradually beat in flour and condensed milk. Add chocolate chips. Put the mixture in the freezer for about a half hour to make it easy/possible to roll into balls.

Shape into 1-inch balls. Put them back in the freezer.
Melt chocolate squares in the microwave. Dip each ball in the chocolate, then place on wax paper to set. I like to drizzle them with a lighter colored coating at this point – these were drizzled with peanut butter candy coating.

Store them in the fridge for at least an hour before they are ready to serve (or in the freezer for 15 minutes if you’re desperate). And enjoy!
Quick substitution – if you like nuts, which we don’t especially, you can substitute 1/2 cup chopped nuts for 1/2 cup of the mini chocolate chips!
Cheesecake Stuffed Strawberries (God Bless America)
July 6, 2010 at 8:55 pm | Posted in Uncategorized | 3 Comments
God Bless America. In honor of the Fourth of July (and in light of the fact that we were moving and unpacking boxes on the holiday weekend), I wanted to make something patriotic (and easy) to take to a BBQ before the fireworks. The standard. I decided on cheesecake stuffed strawberries, topped with blueberries, and they were delicious. And easy. And festive.
But don’t limit yourself to the Fourth of July for this dessert – Matt said, “Feel free to make those anytime.” How’s that for Independence Day? Feeling free indeed…
I hope the feeling inspires you too.
a pint of strawberries
8 ounces cream cheese, softened
1/4 cup powdered sugar
1/4 teaspoon vanilla (or vanilla bean paste)
chopped pecans
blueberries
Beat together cream cheese, sugar, and vanilla (I used vanilla bean paste – I love that stuff!) until combined. Spoon the mixture into a large bag and cut off the corner.

Cut a slice across the bottom of each strawberry so that they stand upright. Place berries, cut side down, on your plate. Carefully cut the berries into 4 wedges from the point, cutting close the bottoms. Next, spread the wedges with your fingers just a little so you can get the tip of your cheesecake filled bag inside!
Now.. fill the strawberries with the cheesecake!

Top with blueberries and pecans as you like. These would also be delicious sprinkled with graham cracker crumbs!

Tie Dye Wedding Cake
June 26, 2010 at 2:39 pm | Posted in Uncategorized | 1 CommentTags: tie dye, tie dye wedding cake, wedding cake
A few years ago, some friends asked me to make a Tie Dyed cake for their “hippie” themed wedding. They were getting married a little later in life and weren’t worried about having a fancy, traditional tiered wedding cake. In fact, they told me I could just make a standard sheet cake with some sort of tie dyed frosting. I agreed to give it a shot and felt pretty good about it.
I went to our local baking supply store and asked for their input. The shop proprietor was HORRIFIED at the suggestion that I would be making a sheet cake for a wedding. My optimism quickly evaporated as I realized that it really would be better to make a tiered cake. I had never made a tiered cake, and it would be a lot of pressure to make one for a wedding. I actually had dreams about it crashing down en route to their reception.
But ultimately, it ended up turning out great. I’m so happy with how it turned out that I end up showing the pictures to my friends often, and it seems appropriate to share them here!
I ended up making 3 tiers – 6 inch, 9 inch, and 12 inch layers. Each tier was a triple layer, and each layer had two colors of batter. The frosting was a basic buttercream.
I also made these jewels for the top of the wedding cake in the initials of the bride and groom:

Here was the pretty white cake, pre airbrushed frosting.

And here is the cake with the airbrushed frosting:


And here is the cake set up at the wedding:
 And here is the inside of the cake:

One more look:

And most importantly, it was yummy!!
Create a free website or blog at WordPress.com.
Entries and comments feeds.
