Iced Pumpkin Cookies
November 14, 2013 at 9:01 pm | Posted in Uncategorized | 1 CommentTags: iced pumpkin, iced pumpkin cookies, pumpkin cookies, soft pumpkin cookies
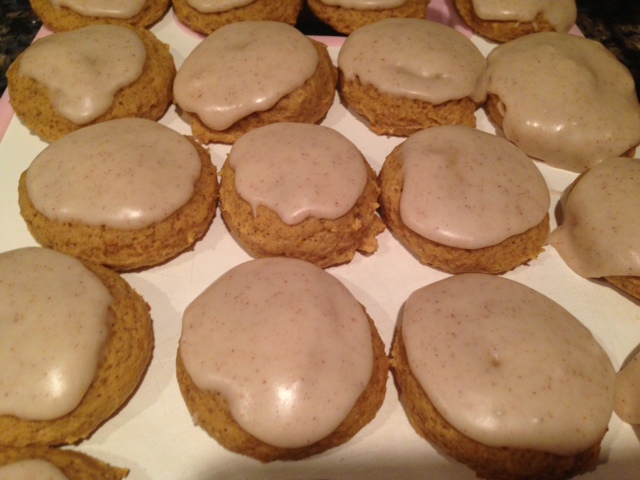
These iced pumpkin cookies are the perfect fall-flavored treat! The pretty cinnamon frosting dried just enough to allow the cookies to be stacked, but still tasted soft and great.

For the cookies, you’ll need:
- 2 1/2 cups all purpose flour
- 1 teaspoon baking powder
- 1 teaspoon baking soda
- 2 teaspoons ground cinnamon
- 1/2 teaspoon ground nutmeg
- 1/2 teaspoon ground cloves
- 1/2 teaspoon salt
- 1/2 cup butter, softened
- 1 1/2 cups white sugar
- 1 cup canned pumpkin puree
- 1 egg
- 1 teaspoon vanilla
For the glaze, you’ll need:
- 2 cups powdered sugar
- 3 tablespoons milk
- 1 tablespoon melted butter
- 1 teaspoon vanilla
- 1 teaspoon cinnamon
Preheat oven to 350 degrees. Combine flour, baking powder, baking soda, cinnamon, nutmeg, ground cloves, and salt; set aside.
n a medium bowl, cream together the 1/2 cup of butter and white sugar. Add pumpkin, egg, and 1 teaspoon vanilla to butter mixture, and beat until creamy. Mix in dry ingredients. Drop on cookie sheet by tablespoonfuls; flatten slightly.
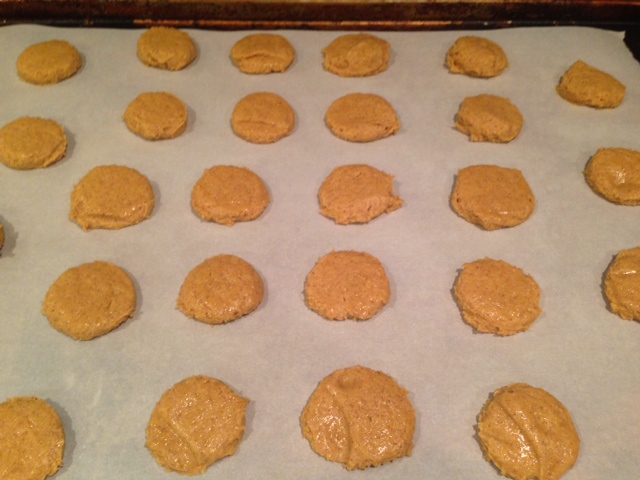
Bake for 15 minutes in the preheated oven. My cookies were on the small side, so I only baked them for about 10 minutes.
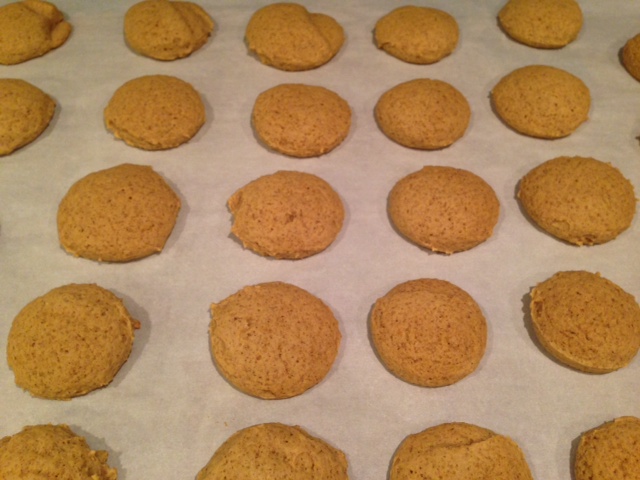
To make the glaze, combine all the ingredients. Add more milk if the glaze is too thick to spread. Once the cookies are completed cooled, lightly frost the tops of the cookies. Allow to sit until the glaze is dry. Yum!
Spicy Ranch Snack Mix
October 11, 2013 at 10:12 am | Posted in Uncategorized | 1 CommentTags: ranch goldfish, ranch pretzels, ranch snack mix, spicy pretzels, spicy ranch pretzels, spicy ranch snack mix

When I was a kid, a neighborhood mom made “ranch oyster crackers” – they were amazing!! When I asked for the recipe, I was surprised to learn that they contained only 4 ingredients – the crackers, dry ranch dressing mix, oil, and dill. You just combined all the ingredients and baked them at low heat – and they were a totally addictive snack!
This grown-up version is just as good, but with a little more kick. The lemon pepper is almost as tangy as the cayenne, so taste and add seasonings according to your preference. I often increase the lemon pepper. And if you really want to make these special, use the butter-flavored popcorn oil!
- 1/4 cup oil – any kind will do but if you want to make it REALLY good, use butter-flavored popcorn oil
- 1 1-ounce package of dry ranch dressing mix
- 1/2 tablespoon dried dill
- 1/2 teaspoon garlic powder
- 1/2 teaspoon lemon pepper
- 1/4 teaspoon cayenne pepper
- 3 cups pretzels
- 1 6-ounce package of cheddar goldfish
Preheat your oven to 250.
Combine the oil and seasonings. Add the pretzels and goldfish and stir to fully coat. Spread the mixture out onto a rimmed cookie sheet and toast for about 20 minutes, stirring at the halfway mark.
Allow to cool and you’re done!
Salted Toffee Chocolate Grahams
October 9, 2013 at 10:01 pm | Posted in Uncategorized | 1 CommentTags: cracker candy, salted toffee, salted toffee chocolate bark, salted toffee chocolate grahams, salted toffee grahams, starbucks chocolate grahams
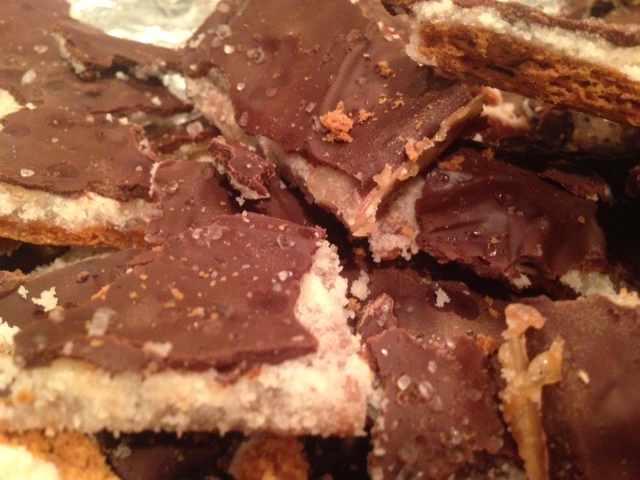
This bark is the result of a happy experiment, and it offers a combination of some of my absolute favorite flavors.
In the last few weeks, multiple people have recommended that I make “cracker candy” – a concoction of toffee soaked into saltine crackers and topped with chocolate. I’ve made it before, and it’s good, but I don’t love it.
But I started thinking about those chocolate covered graham crackers at Starbucks – maybe graham crackers would make the perfect base for a variation of cracker candy. But what is it that makes cracker candy so popular? Is it that salty hint that comes from those salted cracker tops? So I decided to add a topping of coarse salt to the chocolate layer. And it was exactly right.
These didn’t turn out very beautiful, but they were delicious, and that’s what really matters. Most of the time.
You’ll need:
- 12-13 graham crackers (full rectangle sheets)
- 1 cup butter (2 sticks)
- 1 cup sugar
- 2 cups chocolate chips
- 1 tablespoon coarse sea salt
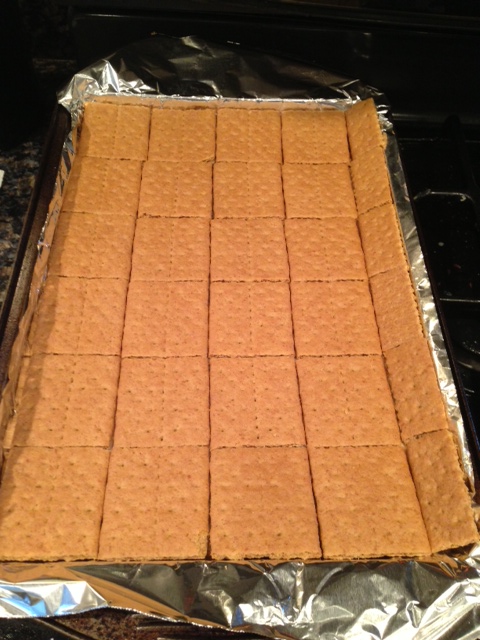
Preheat your oven to 350. Line a rimmed 11×15 baking sheet with foil and place the graham crackers in a single layer, closely touching.
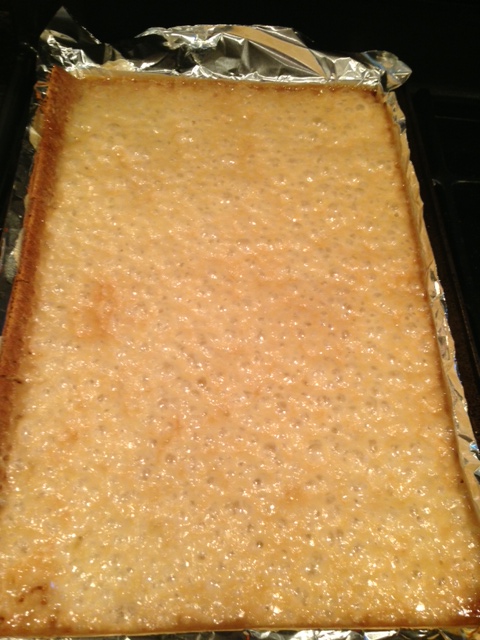
In a saucepan, combine the butter and sugar over medium heat and stir until the butter has melted. Once the butter has melted, let the mixture bubble for 4 minutes. Pour the mixture over the top of the graham crackers, spreading to cover completely.

Bake for 10 minutes.
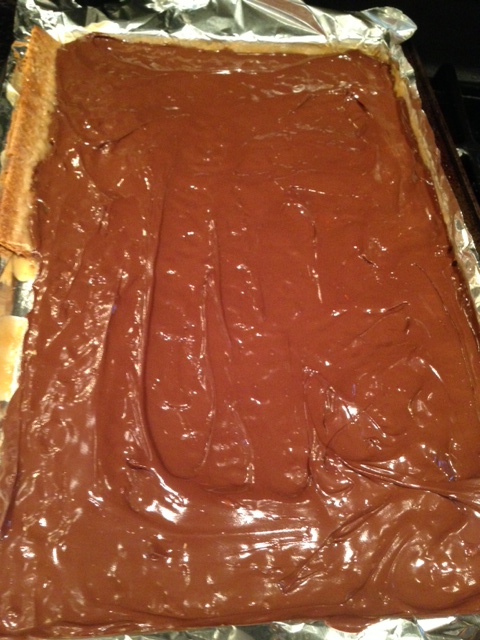
Sprinkle the chocolate chips over top immediately.

Once the chips have melted, spread them with a spoon to cover all the toffee. Sprinkle liberally with sea salt.
Allow to cool until chocolate has hardened. This treat didn’t cut very nicely, so it was better to break them against the counter, creating a bark. Delish – eat your heart out Starbucks!

Cake Batter Bites
October 6, 2013 at 7:10 pm | Posted in Uncategorized | 2 CommentsTags: birthday cake bites, birthday cake truffles, cake batter, cake batter bites, cake batter truffles
I still remember when the first Marble Slab Creamery opened in Knoxville, Tennessee – where your ice cream was “mixed” on a cold marble slab and your favorite toppings were smashed throughout your ice cream flavor of choice. One of my favorite combinations was fresh strawberries mixed into cake batter ice cream. Yes, it was a novel idea – cake batter flavor!! Now we’ve seen everything in cake batter flavor – from ice cream to vodka. This trend is here to stay, and I’m not complaining.
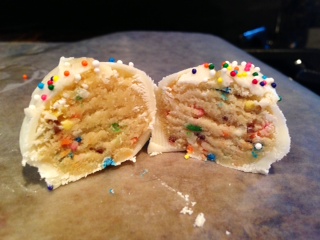
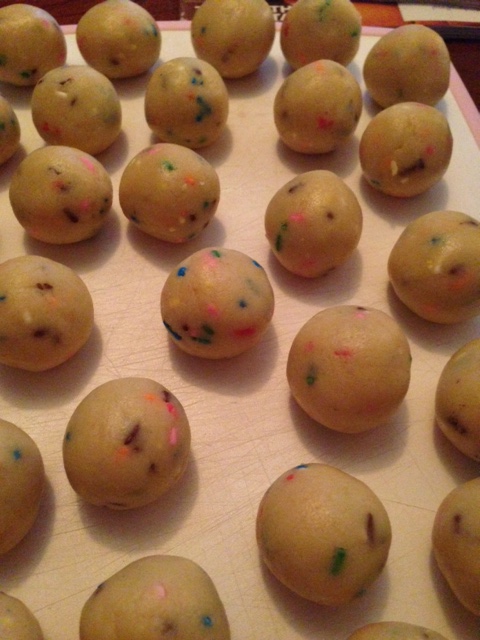
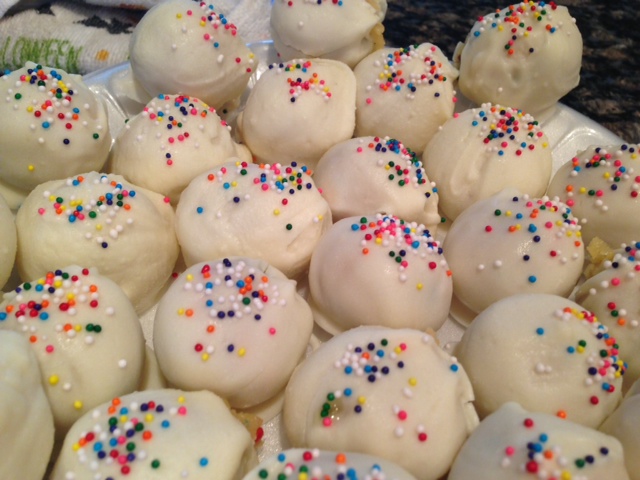
So this brings us to these cake batter bites – we love cookie dough truffles, we love cake batter dip – what could be better than this colorful, sweet combination of those two treats? Plus, it was my friend’s sweet son’s first birthday – and these seemed like the perfect, cheery sweet to bring to share. Beware – they are delicious – and possibly even more delicious before they are dipped in their coating.
For the truffle bites, you need:
- 1 stick butter, softened
- ½ cup white sugar
- 1 ½ cups flour
- 1 cup yellow cake mix
- 1 teaspoon vanilla
- 3-4 Tablespoons milk
- 2 tablespoons rainbow sprinkles (jimmies)
For dipping, you need:
- 16 ounces white almond bark
- 2 tablespoons cake mix
- 1 tablespoon rainbow nonpareils
Combine all the truffle ingredients with a hand or stand mixer, saving the milk for last and adding just enough to create a dough consistency.
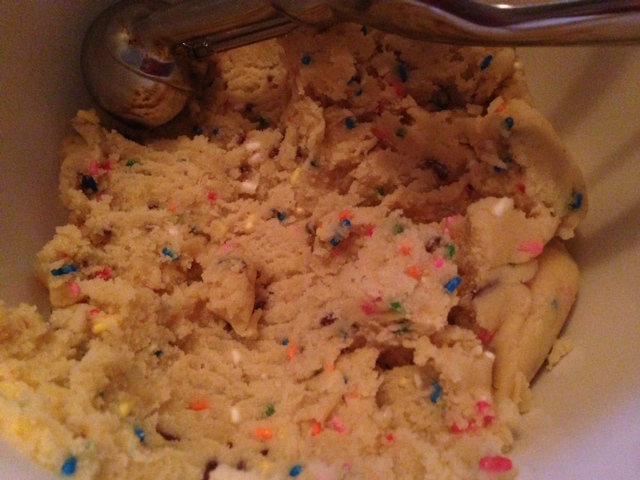
I used my small scoop to create the balls. It probably levels out at 1 tablespoon per scoop.
Next, melt the white bark, and add in the cake mix once it is totally smooth and hot. The cake mix changes the consistency a bit, but it still dips fine. Dip each truffle into the bark and place on wax paper to cool and harden.
Once you start dipping into the white bark, be sure to occasionally top with your sprinkles so they will be stuck to the truffle before it cools.
VT Maroon and Orange Spiral Sugar Cookies
September 12, 2013 at 7:18 pm | Posted in Uncategorized | 1 CommentTags: maroon and orange cookies, team color cookies, tie dye team cookies, virginia tech cookies, virginia tech sugar cookies, VT cookies

Football season continues to provide opportunities for fun baking. This year, I wanted to make some cookies for our first tailgate, but I didn’t want to make sugar cookie cutouts, as I have before.
So I thought I’d make some simple sugar cookies into a fun, team-colored spiral. They were definitely an easier way to make sugar cookies that show your team spirit! Best of all, any colors would work!
First things first, we like this recipe for “old fashioned sugar cookies,” which includes sour cream. This is a recipe from Matt’s mom, and he loves it.
- 4 cups sifted all-purpose flour
- 1 tsp baking powder
- ½ tsp baking soda
- ½ tsp salt
- ½ tsp nutmeg
- 1 cup soft butter or margarine
- 1 ½ cup sugar
- 1 egg
- ½ cup dairy sour cream
- 1 tsp vanilla extract
- food coloring, as desired
Sift flour w/baking powder, baking soda, salt, nutmeg and set aside.
In a large bowl of electric mixer at medium speed, beat butter, sugar, egg until light and fluffy. At low speed, mix in sour cream and vanilla until smooth.
Gradually add flour mixture beating until well combined. Divide dough in half; add your desired food colors to each half.
Form doughs into a ball, wrap in waxed paper or foil and refrigerate for several hours or overnight.
Preheat oven to 375 degrees (or 350 depending on oven) and line cookie sheets with parchment paper.
Between two sheets of wax paper, roll each ball of colored dough to ¼” thickness. Lay the doughs on top of each other:
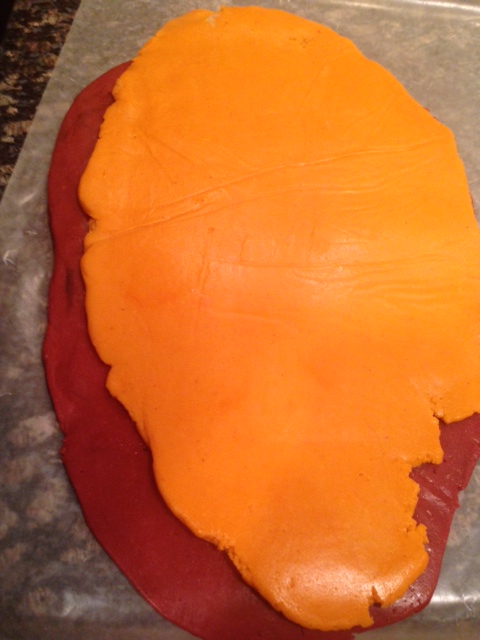
Cut the dough into a uniform rectangle.
 Roll the dough into a log, creating the spiral.
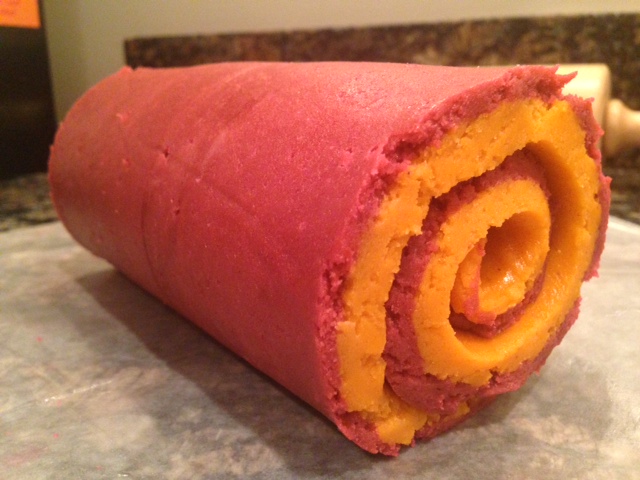
Slice the dough into rounds and place on parchment paper.
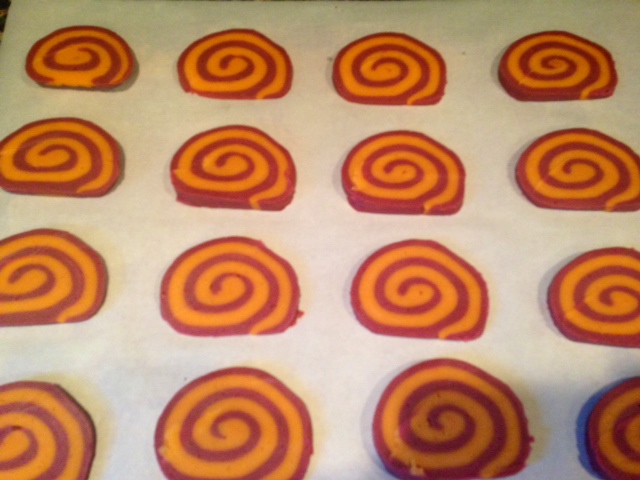 Bake for 6-7 minutes.

Move to a cooling rack, and serve! No decorations needed!
Breakfast Biscuit Cups
September 4, 2013 at 10:46 pm | Posted in Uncategorized | Leave a commentTags: breakfast biscuit cups, breakfast cups, breakfast sandwiches, breakfast tailgate sandwiches, freezer breakfast, tailgate breakfast, tailgate breakfast biscuits
What’s your favorite thing to have for breakfast? Eggs? Biscuits? Sausage gravy? Hashbrowns?
What if you could combine all of those favorites into one portable breakfast? And added cheese?
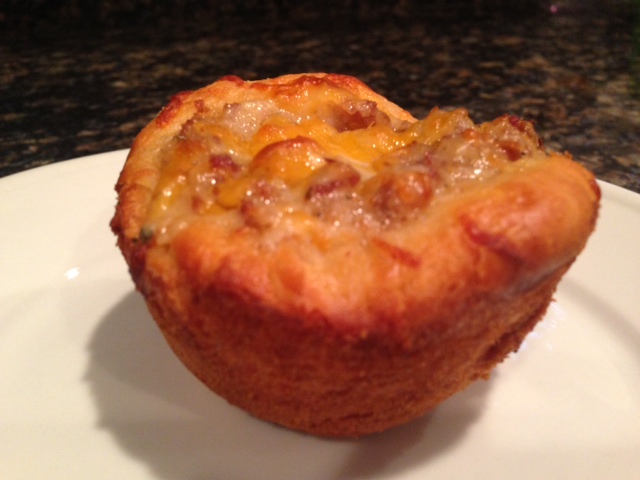
You’d have these fabulous little breakfast biscuit cups!!
You’ll need:
- 1 pound hot pork sausage
- 1 tablespoon all-purpose flour
- salt/pepper
- 2 cups plus 3 tablespoons milk, divided
- 1 cup frozen hash brown potatoes
- 2 tablespoons butter
- 6 eggs
- 2 cans of 10 biscuits (I used Pillsbury Grands! Jr. Flaky)
- 1/2 cup shredded Colby Jack cheese
Preheat oven to 375.
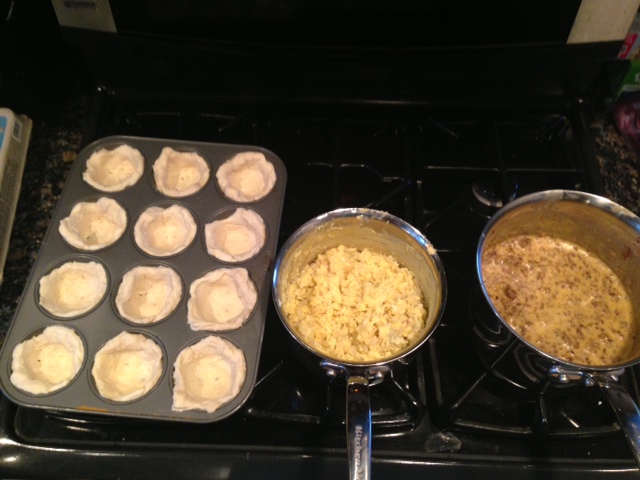
In a large skillet, cook sausage over medium heat until no longer pink; drain. Stir in the flour, salt and pepper until blended; gradually add 2 cups milk. Bring to a boil; cook and stir for 2 minutes or until thickened. Remove from the heat and set aside.
In another large skillet over medium heat, cook potatoes in butter until tender. Whisk the eggs and remaining milk; add to skillet. Cook and stir until almost set.
Press each biscuit onto the bottom and up the sides of 20 ungreased muffin cups and get ready to fill them!
Spoon the egg mixture, half of the cheese and sausage gravy into cups; sprinkle with remaining cheese.

Bake for 15 minutes.

These also freeze well and reheat easily in the microwave. Delicious!
Very Merry Birthday to me… with a beautiful piece of Alice in Wonderland stained glass!!
September 3, 2013 at 5:47 pm | Posted in Uncategorized | Leave a commentTags: alice in the kitchen, alice in wonderland, alice in wonderland stained glass, alice stained glass, alice statue, custom stained glass
It just makes sense that I would have a little Alice in Wonderland paraphernalia in the kitchen at our house.
First, we have a large statue of Alice on top of the refrigerator.
 Yes, it’s true, she is a little creepy, and her eyes follow you all around the kitchen.
I had a “big” birthday this year, and my husband surprised me with an awesome gift: a custom piece of Alice in Wonderland stained glass from the amazing ladies at Terraza Stained Glass.
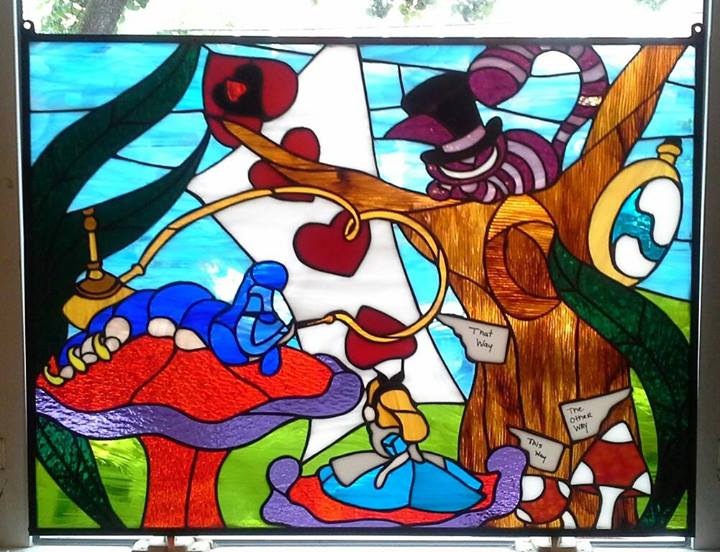
When we bought the house, there was an antique stained glass window hanging in the window, but the previous owners took it with them when they left. I had often said that we needed a replacement for the window to help with the glare, but I could have never imagined that he would come up with such a unique and amazing replacement.
Seriously, it is stunning!!
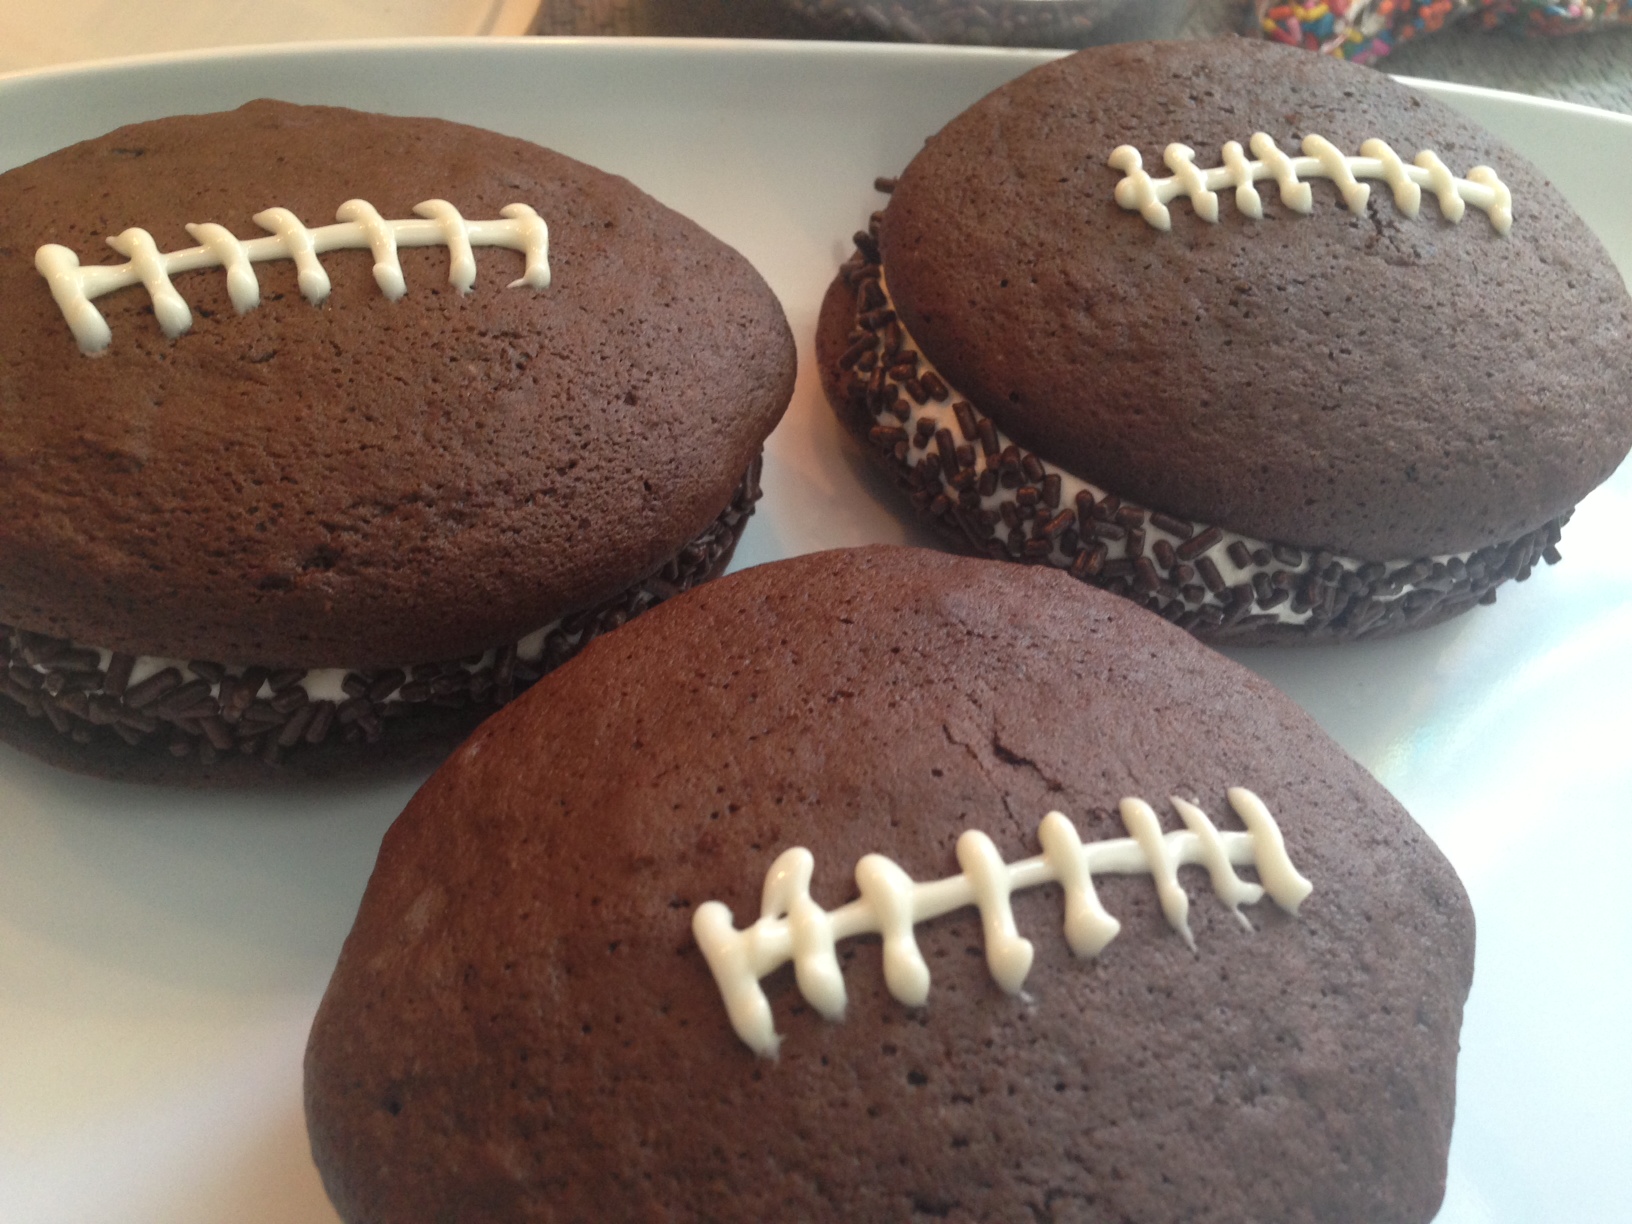
Football Whoopie Pies
August 29, 2013 at 6:57 pm | Posted in Uncategorized | 1 CommentTags: cake mix whoopie pies, football shaped whoopie pies, football whoopie pies, marshmallow buttercream, whoopie pies, whoopie pies with marshmallow filling
I loved this easy, cake mix recipe for whoopie pies, so I brought it back in honor of this year’s football season! Just substitute a devil’s food cake mix for the red velvet cake mix.
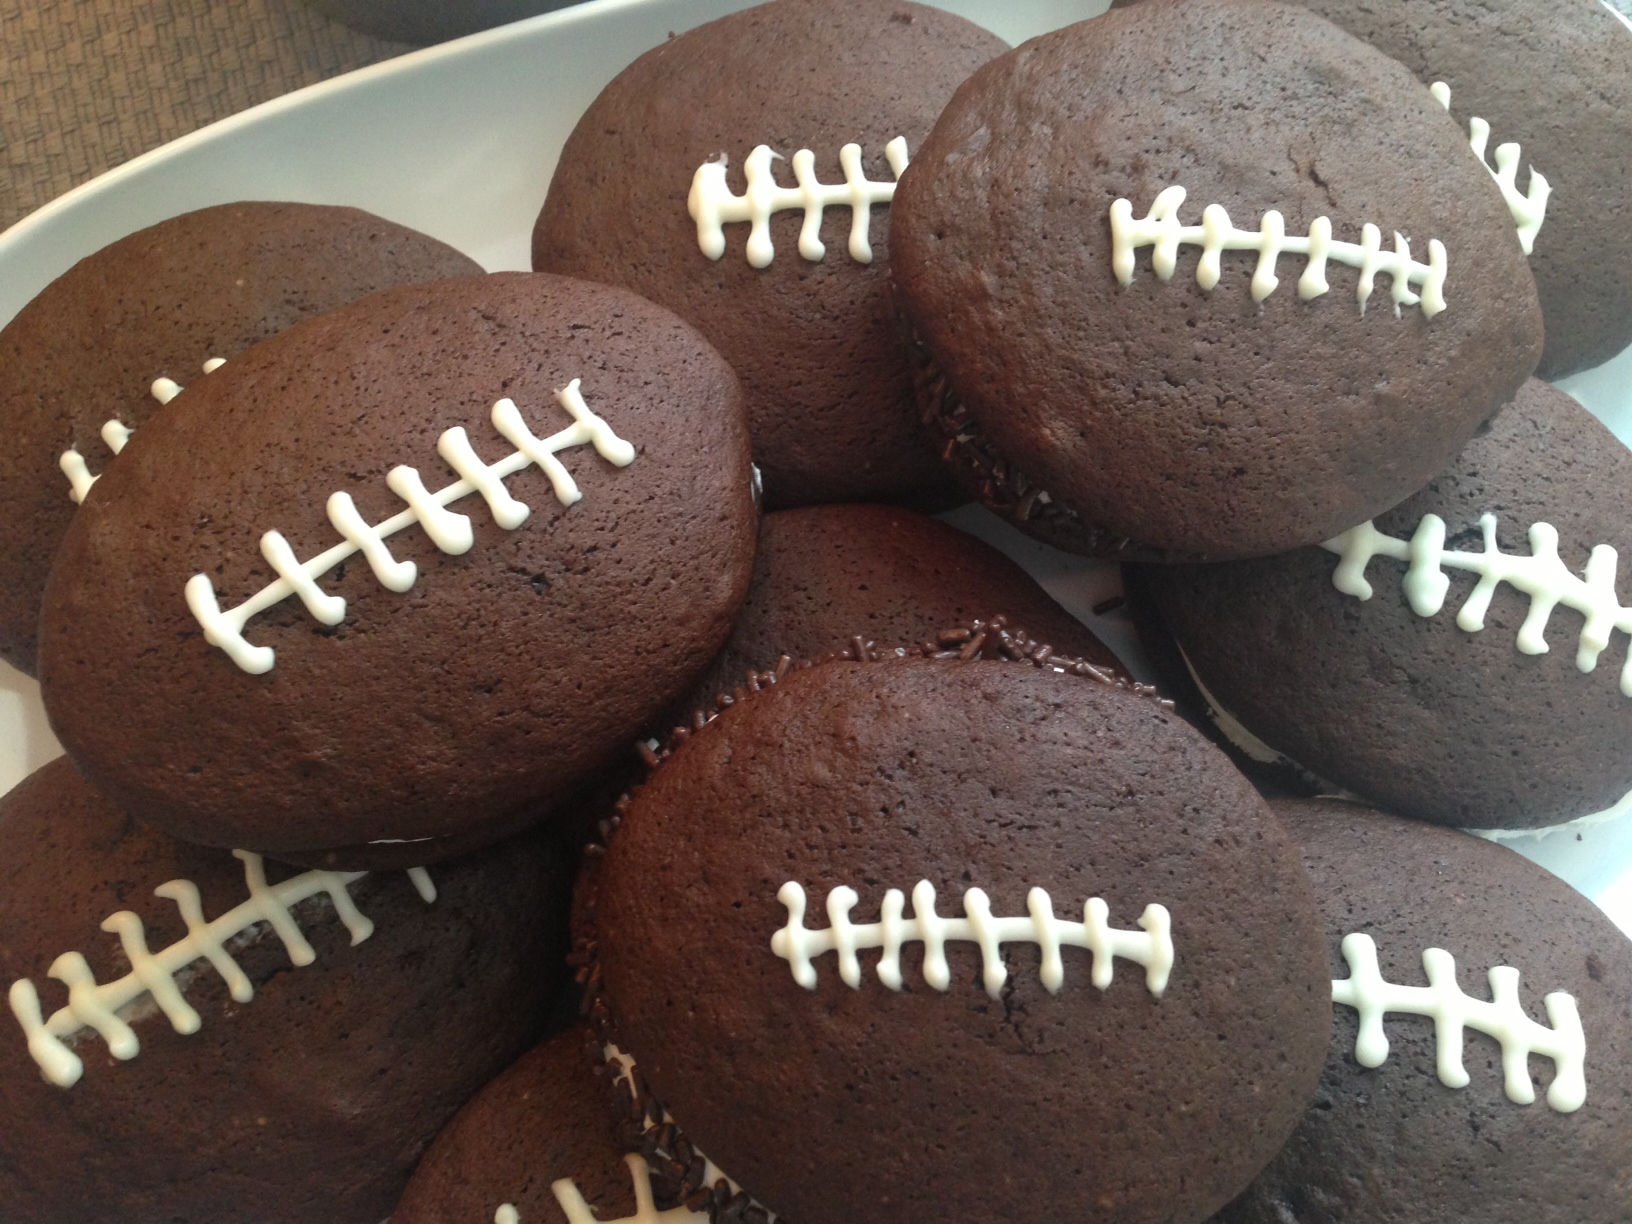
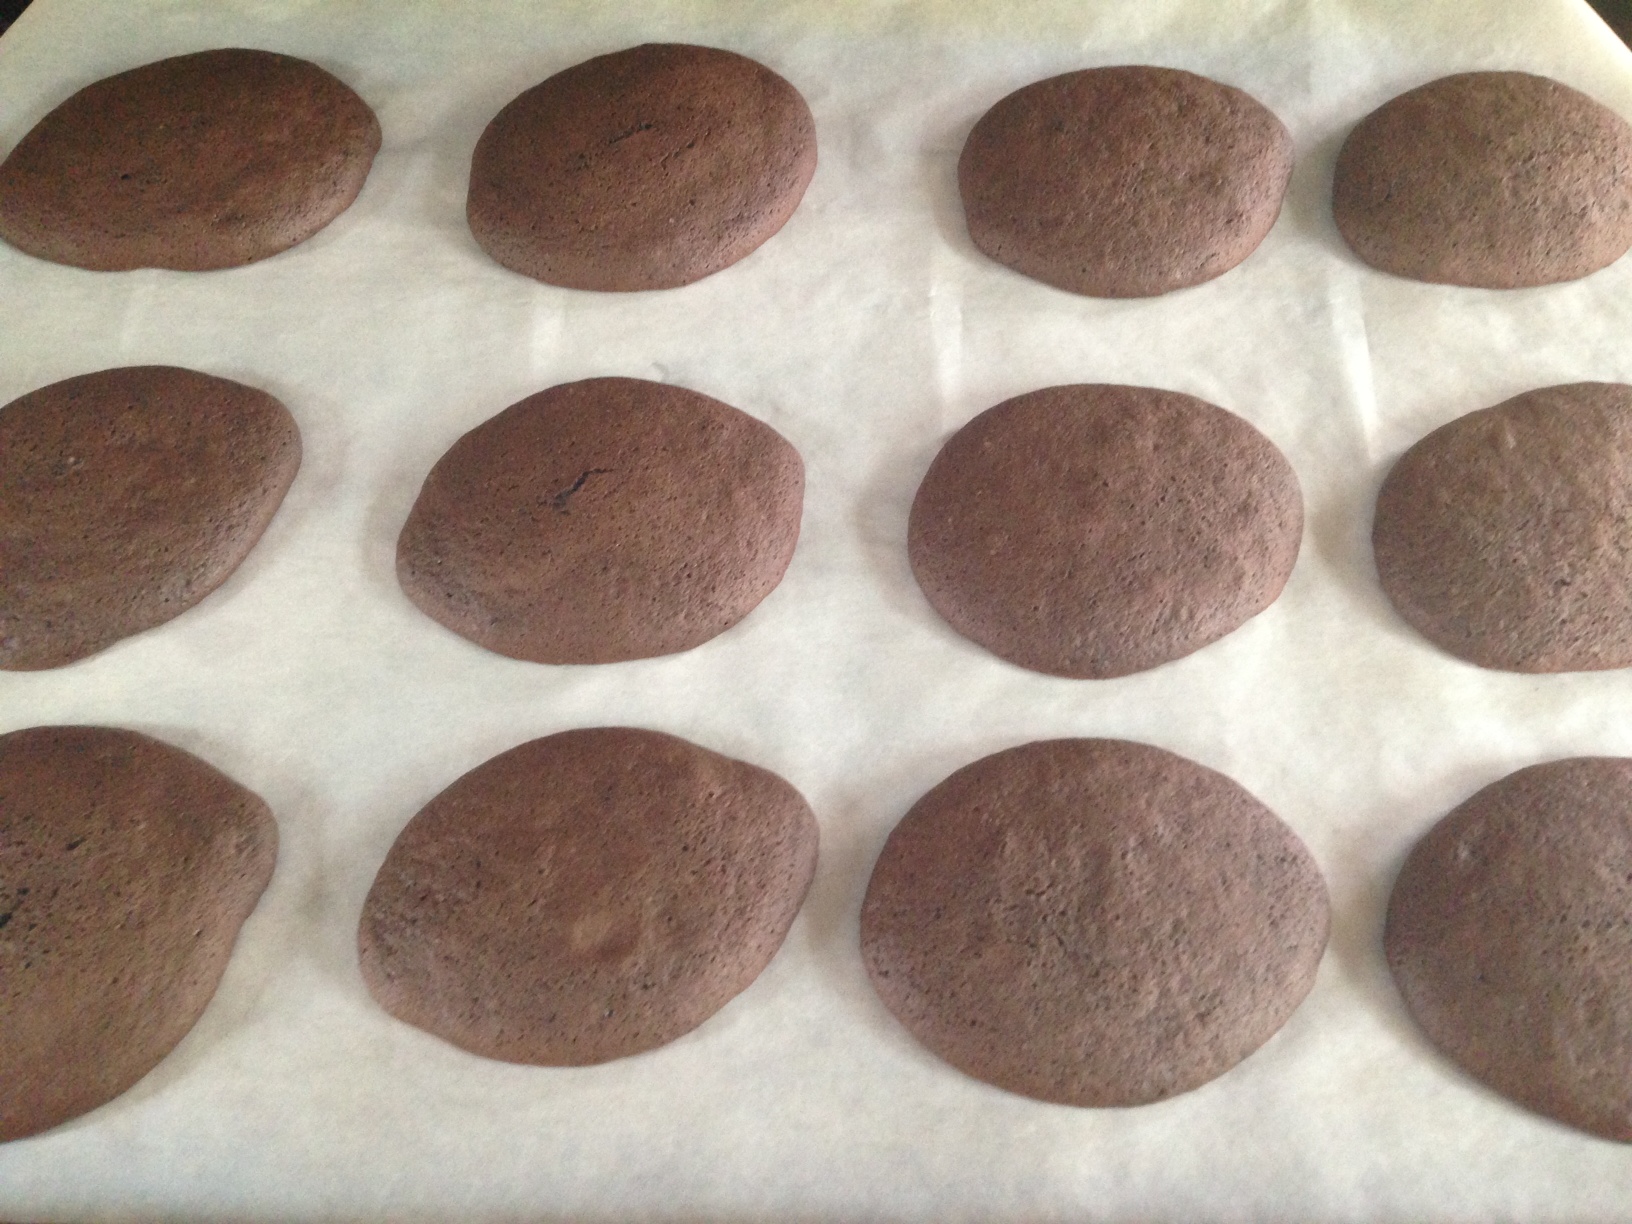
I used the same size scoop for the batter (about 2 tablespoons), I used a toothpick to drag each end of the circle of batter into the rough shape of a football.

They baked up fairly football-like, even if the batter looked fairly imperfect, so don’t worry about it too much.
Fill with the amazing marshmallow buttercream filling from the original post and decorate as you like!!
Best Ribs Ever – made easy in the crockpot!
May 20, 2013 at 8:13 pm | Posted in Uncategorized | 5 CommentsSorry for the food blogging absence… I was caught up in wedding planning! Now I’m back to the kitchen!
Back in 2011, I posted my recipe for the “best ribs ever.” I’m not changing my stance on that. They really are the best ribs ever.
However, they are a little time intensive (just the part where they’re in the oven), and I personally am not comfortable leaving the oven running when I’m not home, so we would only have those ribs on the weekend. Or worse, I’d put them in the oven at bedtime and then get up in the middle of the night to take them out. I love my sleep – so that proves the deliciousness of these ribs! But it wasn’t that convenient… until now.
I discovered these ribs were just as delicious when cooked in the crockpot and finished in the oven under the broiler.
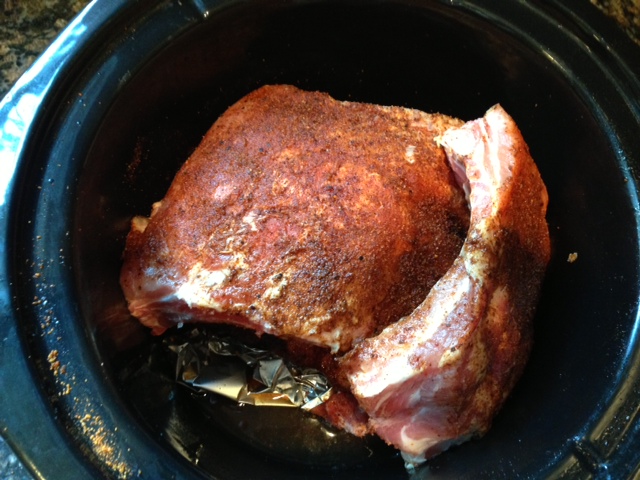
Pour a bottle of Liquid Smoke into your crockpot with one cup of water. Crumple up some aluminum foil to make a “rack” in the bottom of the crockpot so that your ribs aren’t sitting in the liquid.
Prepare the ribs as directed in my original post (score the backs of the ribs and coat them in rub seasoning of your choice), although cut them to fit your crockpot. You can stack them pretty haphazardly.
Cook them covered in the crockpot on low for 8 hours, give or take.
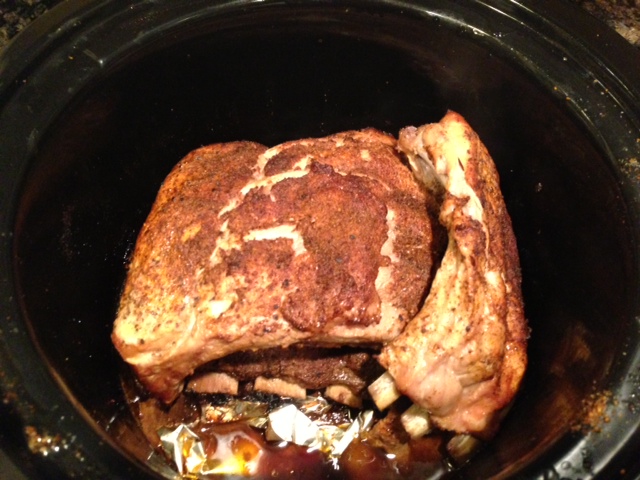
Once you’re almost ready to serve, preheat your oven broiler to about 450 – you want it really hot to caramelize the sauce you’re about to add. The ribs are going to be extremely tender and delicate, so using tongs, pick them up from the crockpot and put them on a cookie sheet. Spread your favorite bbq sauce on them liberally. Put them in the oven, on a top rack, until the sauce starts to blacken and caramelize – about 10 minutes.

Now you’re ready to serve! These ribs just fall off the bone. Don’t be surprised when this is what is left on your plate:
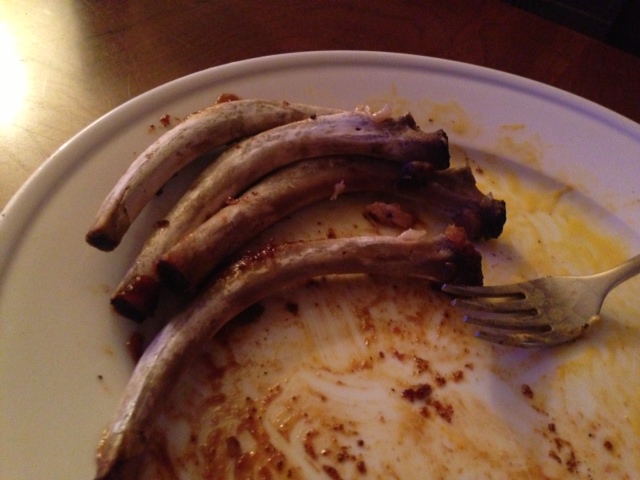
So there you have it – the simplified version of the best ribs ever!!
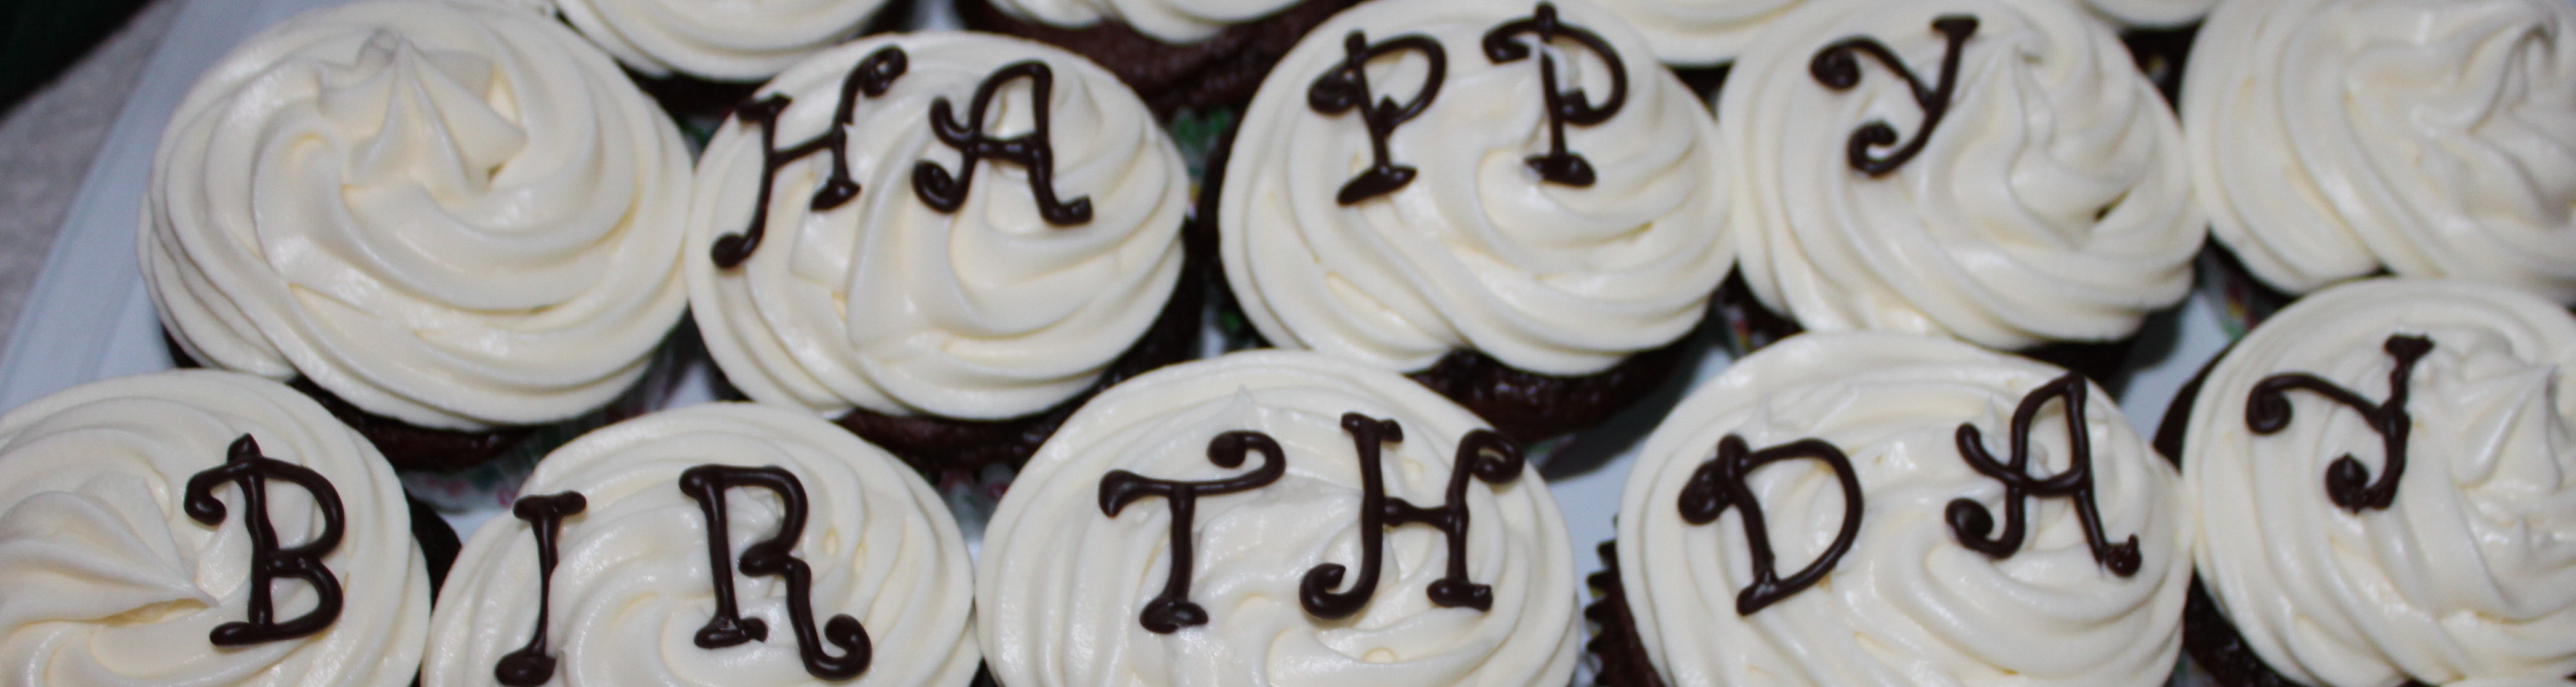
Chocolate Letter Writing
January 10, 2013 at 8:52 pm | Posted in Uncategorized | 3 CommentsTags: chocolate letter writing, chocolate letters, chocolate writing
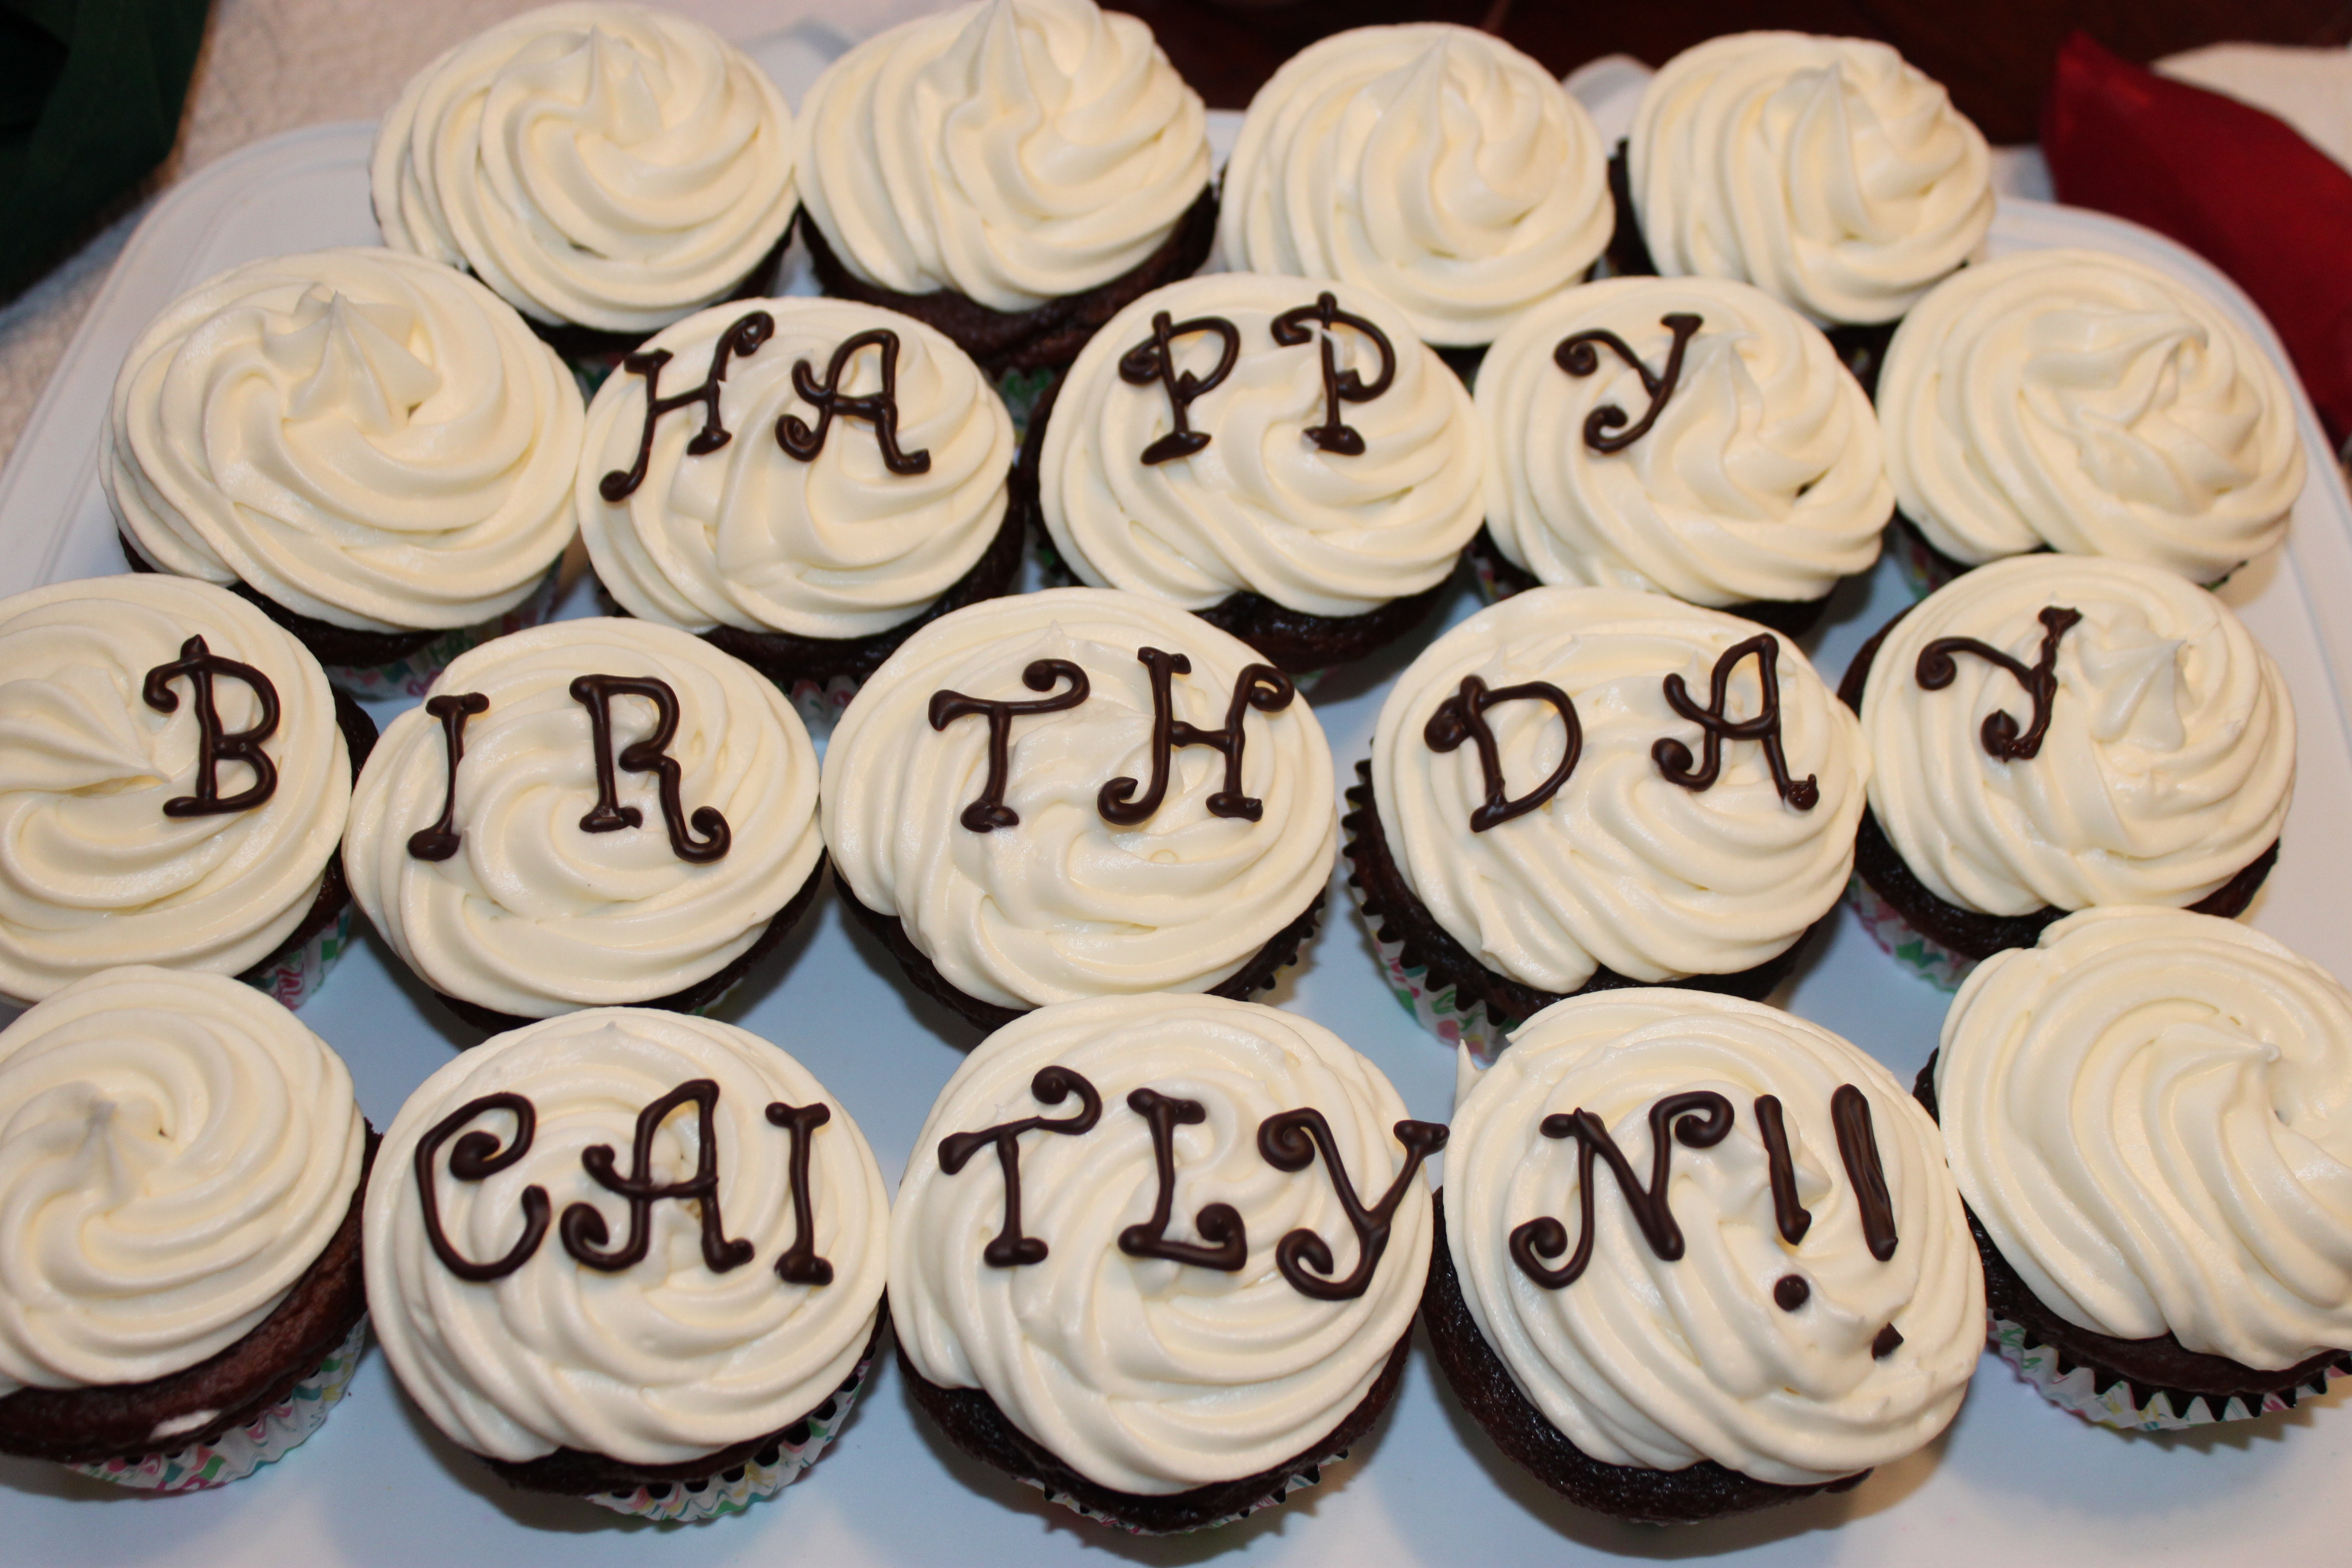
This is a great little trick for making tidy lettering for your next “special occasion” dessert!
First, melt some semisweet chocolate by whatever method you prefer – I like the microwave. Pour the chocolate into a ziploc bag.
Second, print out your desired words in a font of your choice and cover the paper with wax paper, secured with tape.

Cut off a tiny corner from the bag, and begin piping the chocolate onto the wax paper, following the letters on the paper as a guide. You can practice away from your guide letters first (note: extra exclamation points anyone?)

Allow your chocolate to cool completely, and peel your chocolate letters away from the wax paper, quickly placing them on top of your cake/cupcakes/creation. (quickly because your hands will warm the chocolate.)

You’ve done it! Beautiful, easy, delicious chocolate letters!
Blog at WordPress.com.
Entries and comments feeds.
